SCIM with Azure AD
Cyral supports the use of the SCIM protocol to retrieve group information from your Azure AD directory. While Cyral also supports other ways to retrieve group information from Azure AD, the SCIM approach is the only way to get group information for login workflows in which the user does not visit the Cyral Access Portal. For example, a Snowflake login with Cyral SSO relies on Cyral's SCIM integration to retrieve the user's group information.
Prerequisites
Before you set up the SCIM integration, make sure you have:
A working Azure AD SSO integration in Cyral.
tip
Cyral recommends that you create a new Azure AD SSO integration that is not being used in any other Cyral integration in your environment.
Users who will log in with Cyral must have the following identity attributes stored in their Azure AD user record:
first name
last name
username
email
tip
If your Azure AD application uses email addresses as the
usernamevalues, it is possible to populate theemailfield with the value ofusernamein your mappings. See mapping email address as username below.
Get configuration values from the Cyral UI
In the Cyral CP, navigate to Integrations ➡️ Azure AD ➡️ Configure ➡️ find your Azure AD SSO integration and click the pencil icon to edit.
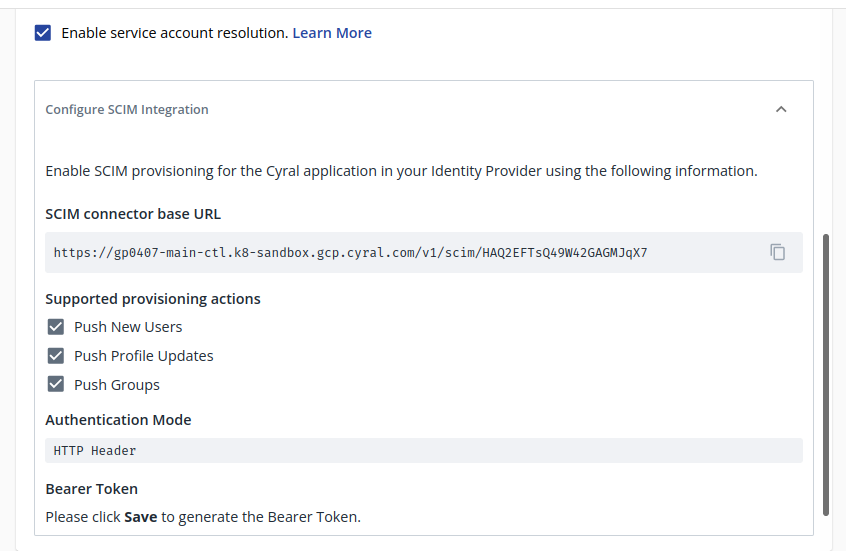
Select Enable service account resolution.
The Configure Your SCIM Integration panel appears:

Note the values shown in the Tenant URL and Bearer Token fields. In the next procedure, you or your Azure AD administrator will copy these values into Azure AD. Keep this tab open, or store these values securely until you need them. These values contain sensitive authentication information (the HTTP Header Token).
Configure Azure AD
Sign in to your Azure AD portal. Navigate to the Enterprise Application that you have configured for Cyral SSO.
In the app management screen, select Provisioning in the left panel.
Click on Get started.
In the Provisioning Mode menu, select Automatic.
In the Tenant URL field, enter the Tenant URL you copied from the Cyral UI earlier. This is the SCIM base URL of your Cyral SCIM integration. For example:
https://example.cyral:8000/v1/scim/aad.9ba88b7e-0a2c-4d93-9d62-44deca32109In the Secret Token field, enter the token copied from the Cyral UI's Bearer token field.
Click Test Connection. This should result in a green checkmark (✔️) in the upper right of the Azure AP portal page.
Select Save to save the admin credentials.
Clicking Save activates two more settings sections, Mappings and Settings:
Mappings: Make sure both the mappings for groups and users are Enabled ➡️ Enabled by default. The default mappings are compatible with the Cyral SCIM service.
tip
If your Azure AD application uses email addresses as the
usernamevalues, it is possible to populate theemailfield with the value ofusernamein your mappings. See mapping email address as username below.Settings: This setting is optional. Add an Email Address where failure notifications can be sent.
Click Save to save your configuration changes.
Refresh the current page and click Edit provisioning. A new configuration field, Scope, appears in the Settings section.
Select Sync only assigned users and groups from the dropdown menu
Set the Provisioning Status to ON and click Save.
To force the sync now:
- Go to the SCIM app page (by refreshing the current screen or by clicking on SCIM app at the top left corner of the page)
- Click on the Refresh icon in the upper right.
Mapping email address as username
If your Azure AD application uses email addresses as the username
values, it is possible to populate the email field with the value of
username while defining the attribute mapping from Azure to the
Cyral SCIM application. In order to do so, please do the following
during step 9a of the ‘Azure Configuration Process’:
Under the Mappings Option, select Provision Azure Active Directory Users
Click on the mapping entry that maps Source attribute
mailto Target attributeemails[type eq "work"].valueIn this entry, change the Source attribute from
mailtouserPrincipleNameClick OK then Save.
Next step
With SCIM configured, your Cyral installation can provide service account resolution for Looker and Tableau, ensuring you know the SSO user identity of users who connect to a repository through a service account. See set-up instructions: